Making the Humanities Digital
UNC SILS, INLS 890-186, Fall 2012
Design Process Overview
The following is lightly adapted from the work of Melanie Feinberg.
The design process that we will be following in this course consists of seven activities. Most of these activities are interdependent; for example, doing user research, part of the learning activity, affects the envisioning activity and the creation of user personas and scenarios. Conversely, however, the envisioning activity may highlight the need for additional learning activities, i.e. to get a better sense of the focus, purpose, or uses of your project.
The following diagram illustrates the relations among activities:
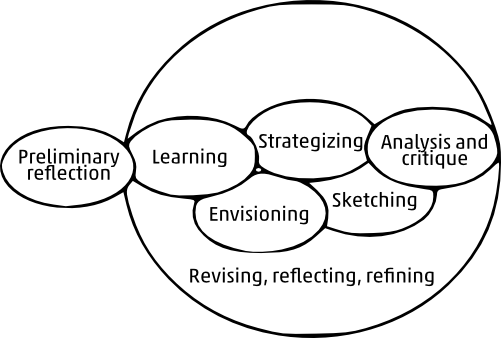
Design Activities Summary
| Activity | Description | Products |
|---|---|---|
| Preliminary reflection | A meditation on your goals and assumptions for the project. | Written note to share with peers. |
| Learning | Getting familiar with the needs and desires of your users and/or audiences and the subject domain of your project. | Written note to share with peers. |
| Envisioning | Creating user personas and scenarios for how users and/or audiences would interact with your project. | Personas and scenarios. |
| Strategizing | Defining your goals and your users and/or audiences’ goals, and determining how your project, through its composition, structure, and functionality will facilitate those goals. | Design brief. |
| Sketching | Showing how the envisioned experience and strategy might take form. | Sketch (on paper, and using Scalar). |
| Reflecting, revisiting, refining | Returning to the different activities as each reveals more about how the design will work. | |
| Analysis and critique | Rigorously and systematically examining your prototype to identify problems and improvements. |
The scenarios, brief, and sketches together make up your design prototype. Each document supplements and reinforces the others. If creating the brief alters your idea of what the project experience is like, you change the scenario. If trying to sketch things out makes it clear that a strategy articulated in the brief won’t work, you change the brief (and potentially the scenarios, and potentially your personas and your idea of who the target users or audiences are). This process of going back and forth and continually asking oneself how all of these activities, documents, ideas, etc. fit together is supposed to help us engage in an ongoing dialogue with our design situation.
Preliminary Reflection
Due September 11.
The preliminary reflection is an opportunity to articulate the goals, assumptions, and feelings that you bring to the beginning of a project and to begin thinking about how these might help or hinder your process. You can also use the preliminary reflection to consider strategies for continuing to move forward despite potential barriers.
Your preliminary reflection should be a written document that considers these types of questions:
- What do I think I’m doing? How do I currently conceptualize goals for this project? What do I think I’m creating? What are its components? Do these ideas seem adequate? Would I rather be doing something else? What? Why?
- What are my fundamental assumptions? What values am I bringing to this project, and how do I see those values affecting my ideas? Is that a problem? What are my feelings toward this project? Is it cool? Challenging? Kind of stupid? Why?
- What do I think I know? What’s my current plan? (For example, do I know what my subject area is? Have I already gotten a sense of what types of content would be accessible through or operated upon in my project? How I would describe and arrange them? What my audience thinks and wants, and how I respond to that?) What has led me to this point? What would change my mind?
- What do I think I don’t know? Where am I totally confused? What do I need to learn to proceed? (For example, do I need to do some subject research? Do I need to think more about how my project would actually be used?)
- What would I rather not think about? Would I be happy to ignore the audience? Would I rather have my audience tell me what to do? What seems like a black hole? Why? Where would clarity come from?
- What seems like a barrier? What are project constraints? Are they really constraints? Am I secretly glad of certain limitations? What kinds of questions should I keep asking myself each week as I work on this?
- Where do I go next? Yes, the course has a structure. But what do I think I should be doing next?
- What am I aiming for? What would a successful project look like? What would a failed project look like?
While these will not be graded, post your reflection on Piazza as a note of about 500-750 words. Although we will not meet on 9/11, please post your reflection by the end of that day.
Then, between 9/11 and our next meeting on 9/18, read your classmates’ reflections and post comments. You needn’t comment on every reflection, but you should read every one. Consider the questions above and make suggestions about directions they might take. This is also a good opportunity to identify potential partners, so you may want to suggest that as well.
Constructing Your Public
Due September 25.
When designing anything, it is tempting to think that there is some already and actually existing group—your “users” or “audience”—for whom you are designing. Carl DiSalvo asks us to consider that this is an illusion. Drawing upon the work of John Dewey, DiSalvo argues that a “public” is not an “a priori existing mass” but “an entity brought into being through issues.” DiSalvo connects this idea to the role of the designer, who no longer acts simply to serve an already existing entity, but instead works to help call that entity into existence, by creating things—representations or artifacts—that allow the public to recognize itself. Antoine Hennion makes a similar point about music producers. He argues that music producers work not only to represent the artist and the music to the media, but also to create and present to the artist a representation of the audience for that music, a representation which helps that audience come into being by allowing them to coalesce around an image or set of issues or experiences.
For this milestone, you will think about how you might “construct a public” for your project. This isn’t typical “user research” in which you go out and try to discover “needs” and “problems” faced by some already-existing group. Instead, you will think about how you might organize and express the content of your project in such a way that a desired public can form around them.
Presumably your project will have some sort of content. It could be texts, data, images, maps, videos, artifacts, or any other kind of resource. It will probably be something available in digital form, but it doesn’t have to be. Think about what exactly this content is and how it will be expressed or presented. Questions to ask yourself include:
- What is it?
- How much of it is there?
- Who are the authorities on it?
- Who controls access to it?
- Who is interested in it?
- What do you personally think about it?
Next, identify at least two actual persons who you imagine could be part of the public for your project. These could be people you know personally, or people whom you know only through their writing or other public communication. Given what you know about their interests and concerns, what different tactics might you employ to help them see themselves as part of your public? DiSalvo’s ideas about “projection,” “tracing,” “temporal stance,” and “discovery,” might be useful here, as might Löwgren and Stolterman’s “use qualities.” Or you might identify other ways of recruiting potential members of your public.
Note that this isn’t about trying to brainwash people into dropping their concerns and embracing yours. It’s about figuring out how to help people see their concerns as part of a larger system of concerns. And it’s about how you might engage them in your project in such a way that it makes the conditions for, and consequences of, that system apparent to them. (By the way, these concerns don’t have to be BIG IMPORTANT ones. Small, everyday concerns need addressing too.)
Spend some time thinking about the issues above, then write up a note of 250–500 words summarizing your reflections and post it to Piazza. If you’ve already formed a project group, you can do this (thinking and writing) collectively. (Remember that Piazza notes work like wiki pages and can be collaboratively edited.)
I realize that all this may sound maddeningly abstract or idealistic, and maybe it is. But don’t stress out too much about it. This isn’t graded, so try your best to wrap your head around the idea of “constructing a public” and have fun with it.
Critique of an Existing Project
Due October 9.
For this assignment, you will analyze an existing digital humanities project to describe how, and how well, it works. First, you will need to think about what the project you are critiquing is intended to be. Is it a tool for scholarly research or analysis? Is it a collection or database intended to illuminate or present a perspective? Does it make an argument? Or is it something else entirely?
Once you have decided what the project you are critiquing is intended to be, you will examine the project from three different perspectives.
First, approach the project from the perspective of a potential user or audience for the project. How does the project communicate to you? Does it entice you to use it? Does it seem useful, entertaining, provocative? Does it help you see something in a new light? If the project is a tool, your critique might focus on its interface, documentation, workflow, and so on. If it is more of a database or collection, you could think critically about how the selection, arrangement, and description of resources work to structure your experience of it.
Next, approach the project from the perspective of someone with something to say. Depending on the nature of the project, this might mean putting yourself in the shoes of the actual author of the project, or thinking about how you yourself would use the project to communicate with an audience. Does the project provide the means to make coherent, compelling points about its subject matter? Is it even possible to discern an authorial voice or position? By what means can such a position be supported?
Finally, try to step back and approach the project from the perspective of a critic. Look at how the project has been received, written about, and commented upon. Is the project successfully mediating communication between authors and audiences? How and where does it succeed and fail? Is it even being used, and how can you tell?
Deliverables
The final paper should be approximately 1,500–2,500 words. While your critique should address specific aspects of the project under scrutiny, it is important that your paper has a larger argument to give it cohesion; the critique should not merely list design elements that you find effective or not effective, but should synthesize your analysis of these elements to reveal a broader thesis about how the project works and its relative success at mediating communication between author and audience. For example, one might argue that a project’s playfulness is enticing to the audience but both trivializes the author’s position and distracts from the audience’s goals, making the project ultimately unsuccessful, and use the body of the paper to concretely show how different aspects of the project design provide evidence for such a conclusion. In conceptualizing and structuring your critique, you may find the readings by Lowgren and Stolterman and Bardzell and Bardzell to be helpful.
Note that while your critique should address the perspectives of audience, author, and critic, you do not need to structure your paper according to these divisions.
Grading criteria
A successful critique will exhibit the following characteristics:
- Presents a coherent thesis that explains how the project works as tool and/or communicative medium, and the degree to which it succeeds in this task.
- Uses concrete examples to provide evidence for the thesis.
- Considers author, audience, and critical perspectives.
- Adheres to professional writing standards: is logically structured and organized, is clearly and concisely written, adopts a professional, scholarly tone, and uses correct grammar, spelling, and punctuation.
Envisioning
Due October 23.
In this activity, you will continue developing your ideas about what your project encompasses, how it is structured, and how people might interact with it.
The thinking you’ve done so far, including your critique of a similar or related project, should enable you to have an initial sense of
- what your project is for,
- the kind of content it provides access to, tools for analysis of, or opportunities for reflection upon,
- who would use it and why, and
- how the project as a whole would be structured.
Do not worry! You don’t really know what you’re doing yet. I know! The ideas that you have now WILL change. (In fact, this activity may cause them to change, perhaps drastically.)
It may seem a bit odd to describe how characters of your invention might interact with your project when you don’t even know what your project is, how you’re going to present it, or what the interface design is going to look like. Indeed, it is weird. But just let go and have fun with it. Think of it like writing some stories, because that’s what it is.
Step 1: Create some characters to narrate your stories
The articles that we’ve been reading in the past few weeks advance different perspectives on conceptualizing the user or the audience. In your personas, or character descriptions, try to assemble your own synthesis of:
- The data-driven approach of Pruitt and Grudin.
- The character-focused ideas of Nielsen.
- The public illustrated by DiSalvo.
Like any good character in a story, your personas should seem like real people in the context of the story situation, or scenario. But like any creation, your personas will need to be more ideal than real in some ways, or else they won’t seem realistic.
At this point, create two personas that represent different possibilities within the audience you would currently like your project to target.
Aim for a couple of paragraphs of description for each persona. Your descriptions should attempt to briefly encapsulate a well-rounded character: beliefs, values, goals, history. You want enough information that you can imagine the persona in a situation with your project, and the persona, if you will, will lead the way in showing you how the interaction might proceed, given the details you confront the persona with.
Potential pitfalls to avoid: blank slates or stereotypes, as described in Nielsen’s article; too much extraneous detail that has nothing to do with the story you’re setting up.
Step 2: put your characters in action
Okay, so now you have people. See what they do!
This may seem a little bit like stepping out over the edge of a cliff. To make it easier, start by writing a couple of paragraphs where you, in your role as the designer, lay out a candidate vision for your project: your rhetorical goals and the position you hope to articulate in the project; some ways that you might implement the project to further those goals.
Now take one of your characters and begin imagining. What does your character—let’s call her Kris—do when confronted with your project? Well, first of all, create the back story: how does Kris get to the project in a way that is plausible for her character? If the way you set up the action makes sense, then Kris, as a character, should “tell” you where to go next. Based on what you think Kris might do, you will then have to articulate your plans for what the project might look like in much more detail.
By the way, don’t just do this in your head; write it out. Really, it’s important to give your ideas flesh that way.
As you continue to imagine the course of your persona’s interaction with your project, pay particular attention to potential conflicts and failures. What would have to change for that not to happen? What would facilitate success for Kris? What does success mean for Kris? Is it possible for Kris to achieve success without your own rhetorical goals being advanced? How can everyone be happy?
Potential pitfalls to avoid: determining the action or the ending in advance; mixing up your goals with your character’s goals; letting your character determine your imaginary project’s features and abandoning your own ideas instead of your adapting your project to enable a productive, asynchronous dialogue with Kris.
For your first attempts, aim for one interaction with each persona. If you are energized, try two interactions with each persona: one success (whatever that turns out to mean) and one failure. But don’t force these outcomes; it may take several iterations to see what needs to happen (or not happen) for you to get there.
For class on October 23: bring your two personas and associated scenarios. We will read at least one persona and associated scenario aloud for each project in the class.
As you proceed with the project, you will have multiple versions of these scenarios (and perhaps of the personas as well). Keep all your versions; this is great documentation of your evolving thinking. When it comes to turning in your final product, though, you will submit just the final version of your scenarios, one that is nicely synchronized with your design strategy brief and sketches.
Strategizing
Due November 6.
You’ve started to get a sense of what you want your project to be and what your users and audiences might initially expect when interacting with your project. For this activity, you will begin to describe what you are trying to do and how you think you are doing it. Why? So that you can commence sketching in a more informed way, with a better sense of your broader goals and concerns.
The product of your strategizing is the brief, the second of the three documents that together make up your project design. The brief has two parts: in the first part, you articulate your goals for the project, balanced against the user and audience beliefs, values, and expectations that you see. You also describe the scope of the artifact you want to create to advance those goals. In the second part, you lay out in some detail precisely how each design decision you make works to facilitate the goals that you described.
In your first draft of the brief, your documentation will be concise and general, limited to discussion of your overall strategy. As your design takes greater shape, via the scenarios and the “sketch,” you should be able to explain how every decision fits into your overall plan, and you will be able to provide greater detail in the brief. At the conclusion of the project, you should provide some rationale for the way you’ve approached every item listed in the following outline. You won’t need to provide a blow-by-blow of every decision that you made, but you should, for example, describe the general strategies you employed, using specific examples to clarify your descriptions.
Note: You do not need separate sections for each of these items in your final brief. These details are included to help you, not unduly constrain you. You might end up writing a paragraph or two for each numbered section in the Goals part of the brief, for example.
Will the strategies you describe in the brief require changes to your scenarios? Maybe! Revise those too, if necessary.
Strategy brief structure
Part 1: Goals
- Design goals
- Your definition of X, where X is “the kind of thing your project is.” For example, you might see your project as “a scholarly tool”, so here you would define as precisely as possible what you mean my “a scholarly tool.” Or X could be “a repository for public memory,” or “a platform or activism,” or… it’s really up to you. The goal is to be able to rigorously define X, whatever you choose X to be.
- Your position or perspective with regards to the goals or content of your project. Where do you stand? What is the argument or intervention you would like your project to make? How would you like it to change current practice or thinking?
- Users and audience background
- Knowledge
- Goals and desires
- Beliefs
- Values
- Expectations for this type of project
- Summary of your design solution, framed as a negotiation between the designer (you) and your users or audiences
- Outcomes
- What might constitute a successful outcome for your project, in terms of both your own goals and your users’ and audiences’ goals?
- What might constitute a failed outcome?
Part 2: Design Rationale
- General strategy: how will you design your project to be compelling for your audience and users, where your design goals are met and your users’ and audiences’ needs are satisfied?
- Specific choices: how does your general strategy translate into specific design decisions? These would be things like:
- the specific features your project offers, as well as what it intentionally doesn’t do
- whether specific functionality is customizable or not
- what information and how much of it you show in different views
- the language, tone, style, and brevity of textual explanations or descriptions
- where and how imagery and visualizations are used
- metadata fields, browsability, searchability
- etc., etc. etc. Basically, any detail of how your project looks or functions should be justified here.
Sketching
Due November 13.
A sketch is nothing more than putting some effort behind an idea, progressing one small step toward seeing how one’s thought might work in practice. Now that you have a sense of your project, your goals for the project, and your target users or audience, an evolving idea of what the user experience with your project might incorporate, and a start at figuring out a design strategy, you can begin to synthesize all of these swirling thoughts and sketch your project into a more concrete existence.
For designers, initial sketches function as low-effort idea generators, similar to your initial drafts of personas and scenarios. The goal is to give an idea enough structure to see what it reveals about the design situation and to invite comment, from oneself and others. A sketch is an opportunity to expand on selected aspects of a design while for the moment ignoring others.
Most of the literature on sketching comes from product design and architecture, and notions of sketching focus on the depiction of physical objects and representations of the built environment. However, information architects and user interface designers also sketch, often with less visual emphasis. Web site maps and wireframes show structural components in schematic form, and are a form of sketch. Software menus and commands may be mapped out as text hierarchies, in preliminary sketch form. A classificationist might “sketch” out categories and relationships in a taxonomy or thesaurus.
At the beginning of a project, these representations are rough and tenuous, ready to be changed or scrapped. As the project continues and the design begins to solidify, the sketches become more detailed and represent the results of one’s various design decisions (closer to Buxton’s memory drawings). As Buxton emphasizes, sketches at various levels of sophistication are useful for communicating ideas to others and soliciting feedback (as with Buxton’s presentation drawings). Eventually, more refined sketches supplement specifications and facilitate implementation (analogous to Buxton’s technical drawings), and document intended features and uses (Buxton’s description drawings).
Initially, your sketches should be just that; loose, disposable, and multiple. As we did in class, try a few different means toward the goals articulated in your brief and scenarios. If the sketching process illuminates some glaring holes in your previous work, excellent! You should be more worried if it doesn’t do that.
By the end of the project, your sketches will be more like presentation drawings: coherent and consistent, and showing enough to clarify what your project would look like, if you had the extra months to implement your entire vision. To make the project more “real,” you will also attempt to “sketch in software” by taking one of your sketches and implementing it using the tool(s) of your choice.
A note of caution here: even at the end of this class project, your “implemented” sketch is not meant to represent a final product, but to flesh out and make interactive just one aspect of what that product might be. Your goal is to show what, given the time and resources, your final product would look like. The sketches, interactive and non-interactive, are one aspect of that vision. Your scenarios and brief complement and expand upon the sketches, filling out your intended design.
Although your final sketches can be “drawn” using whatever tools you feel comfortable with, we will begin with paper sketches to encourage multiple potential design pathways. Exploring several directions at once seems to facilitate creativity and result in stronger designs.
Bring to class:
- Three sketches that show three different alternate designs for a potential “home page” or initial view of your project.
- Additional sketches (three each) of at least two additional “views” in your project. For example, you might sketch a view showing how a set of search results is displayed, and a view showing how the details of some document or artifact or data set are displayed.
So in total you should have at least nine sketches: three sets of sketches, where each set is a coherent group of at least three sketches showing aspects of a different design.
Reflecting, Revisiting, Refining
Due November 20.
Recall the overall map of our project design process. At this point, you have drafts of all three of the documents that together make up your design. You have a set of artifacts, some of which (the scenarios, the sketches) lay out various aspects of your evolving vision, and one that (the brief) starts to explain that vision. Now you have the wherewithal to present a case to yourself and others, and to interrogate that case. “This is what I think I’m doing, and this is how I think it works,” you can say, and then you can ask yourself, what are the underlying judgments at work here? Are they the right ones? Is there perhaps some hidden contradiction or conflict that I’ve been ignoring but that shows itself in inconsistencies between my different artifacts?
Now you have to bounce your way around your activities and artifacts, potentially reworking and reshaping them quite significantly, perhaps less so, but all the while coming to a more active sense of the ways in which the what, why, and how of your design fits together (or how it doesn’t). Whenever you question what you’ve done, your resulting design will be stronger for it, even if it means you need to throw out what seems like good work.
Read Wolf et al. on design judgments, and then spend some time trying to identify, articulate, explore, and interrogate the judgments that underly your design choices. Come to class prepared to participate in a discussion that explores how the conscious and unconscious judgments you’ve made have shaped your project direction and decisions.
(Part of the goal here is to get you thinking in ways that you can also use to inform your final reflective essay.)
Analysis & Critique
Due November 27.
While you have been sharing your interim progress with your classmates, those informal feedback sessions have focused on a specific activity each week, as opposed to the entire design. Now, however, we can take a step back and contemplate the whole: your overall vision and how you have distributed it over the three design documents. From this vantage point, we are better equipped to recognize our good ideas and identify areas where we might take them further, or where perhaps their utility ends.
In a traditional design studio environment, this stage would involve a “crit” session, in which everyone would present their ideas to the others, who would in turn interpret, interrogate, and comment upon the designs. Beginning November 27, we will have two class sessions devoted to just such a crit.
When attempting to analyze and critique your own work, it’s important to be honest about the strengths and weaknesses that you see. One of the marks of a professional designer is to recognize that one’s allegiance is to the project, not to one’s self. This is extremely difficult to manage in practice, because (in conjunction with traditional ideas of authorship, control, and artistry), those who create tend to identify personally with the creation. We feel attacked and defensive when cherished aspects of our work are questioned. While this is normal, and while we may always be subject to such feelings, we will all benefit from attempting to view our work as if someone else created it. Refining our abilities to rationally, systematically, and compassionately understand and critique others’ work can help in approaching our own.
In presenting your work to others, try to:
- Explain your motivating goals and strategies for achieving them.
- Lay out your background assumptions (notions of genre conventions, or ideas about audience characteristics and expectations, for example).
- Articulate your conceptions of success and failure, perhaps expressing them as a continuum of user/audience actions and reactions.
- Show how your various design decisions work within this context of goals and strategies, assumptions, and potential outcomes.
When you present your work to others, provide your own honest assessment of what you’ve done and point out areas where you feel uncertain about your decisions. Try not to focus on justifying or validating your performance (e.g., “overall, I feel like I did a good job because …”). Instead, focus on helping your peers to understand your interpretation of the artifact you created, so that they can better identify possibilities for improvement. Your goal in encouraging critique should be to better or differently understand the work you’ve done, in order to facilitate its evolution.
In providing feedback on others’ work, first try to understand the design on its own terms, based on its creators’ goals, assumptions, and determination of potential outcomes, and see how it works on that level. (Try to avoid the temptation to think about how you would have done it and to be irritated at those decisions that don’t match your personal preferences.) If you don’t understand why a particular decision was made, or how it fits into the stated goals and strategies, ask. These kinds of questions can actually be the best sort of feedback, because they can make the creator think about some element that he or she might not have actually considered systematically before.
If you think that something works well, or that something could work better, don’t just say that you like it or that choice X isn’t what you would have done. Explain why the decision works in terms of the articulated goals, or explore what might have served the goals better.
In this situation, it is also appropriate to question more fundamental strategies and assumptions. Could an alternate perspective productively enhance the design? Differences of opinions between assessors, by the way, can provide interesting avenues for discussion. If the whole group—multiple assessors, the initial creator—can get involved in an extended discussion where multiple interpretations of the work are examined, then the creator will have the benefit of a wide variety of reasoned, informed opinions to work with. And our goal for this activity, in the end, is really to understand both the work’s current state and its potential in more depth.
As noted above, we will have critique sessions over the next two weeks. Each group will have 20 minutes to present their work and solicit feedback from the assembled group. You can determine for yourselves how to structure your time; however, remember that your goal is to get into a deep conversation about your project and not to present a monologue about your project. Note that you do not need to present everything that you have done regarding your project; your time will likely be more productive if you focus on just a few decisions.
See if you can creatively draw upon the strategies described in Tohidi et al. to devise a critique plan that will elicit reflective commentary from your assessors. Try to think of something that will generate a useful dialogue between you and the people reviewing your work, where you receive productive suggestions for improvement that help you evolve your thinking about your design.
Design Project
Due December 13.
Throughout the semester you have been iterating on the design of an original digital humanities project. Your final deliverables will showcase your most developed and polished conception of this project.
Deliverables
Performing the design activities throughout the semester will lead to the production of the three design documents that will constitute your final design plan:
-
A set of at least two personas and scenarios in which your vision for the project is articulated through an exploration of the ways that potential users might interact with it. Here, you will show potential interactive experiences that might result from the intersection of the project that you design with the actions, thoughts, feelings, and decisions of the user audience.
-
A design strategy brief that describes your communicative goals for the project, your interpretation of the user audience and its needs, and the strategies that you will use to reflect these through the design of the project.
-
A set of at least three “sketches” of the envisioned project, where each sketch shows a different aspect of the design. In addition, you should provide a basic flow diagram showing how your three sketches fit into the overall workflow of the project. At least one of these sketches should be interactive; i.e. it should be implemented in some medium that enables a user to interact with it.
Grading criteria
A successful assignment will exhibit the following characteristics:
- The designer’s goals are clearly and appropriately defined and a strategy to accomplish those goals is articulated (primarily in the brief).
- The users’ needs and values are clearly and appropriately defined, and a strategy to satisfy those needs is clearly articulated (in the personas and scenarios, and in the brief).
- The design strategy articulated in the brief is cohesively and comprehensively illustrated through the scenarios and sketches.
- Users’ interaction with the project conveys the designer’s perspective or position in a way that the users would find persuasive and compelling.
- The design documents are professionally prepared, with clear document structure, clear and concise writing, correct grammar and spelling, and so forth.
Final Reflective Essay
Due December 13.
In this essay, you will ponder what you have read, what you have done, and what you have produced in this course, and you will write a cohesive, 1500–2500 word (6–10 page) paper that uses these thoughts and experiences to critically respond to one, two, or all of following questions:
-
What does it mean to “design” a “digital humanities project”? How does this activity differ (or not differ) from
- traditional forms of humanities scholarship, and
- traditional ways in which libraries, archives, and museums provide access to their materials?
-
How are the goals of an designer and those of an audience or community of users to be negotiated in the design of a digital humanities project? How does the designer acknowledge and facilitate the will and power of the audience while also advocating for a particular way of seeing or doing things?
-
How should digital humanities projects be critiqued or evaluated? How can such an evaluation can be made rigorous and systematic?
In your essay, use both the course readings and your design project experiences to substantiate your answers to these questions. Make sure, though, that the emphasis is on critical examination of a topic, and not a mere report of what you did or a justification for your design decisions. Your essay might discuss how concepts from the readings and the experiences from the design activities have (or haven’t) influenced your thinking about the purpose, properties, and uses of digital humanities projects, and about the goals, processes, and responsibilities of project designers.
Grading criteria
A successful essay will exhibit the following characteristics:
- Presents a coherent thesis that addresses one, two, or all of the suggested questions.
- Provides evidence for claims via both course readings and project design experiences.
- Critically examines the selected topic in a way that uses, but goes beyond reporting of project work and justification of individual design decisions.
- Adheres to professional writing standards: is logically structured and organized, is clearly and concisely written, adopts a professional, scholarly tone, and uses correct grammar, spelling, and punctuation.
If you are submitting a multi-authored paper, please add a brief section indicating who is responsible for which parts of the paper.